Setup & Running on Mac & Linux
Note
This help should be accurate and comprehensive. If you see anything missing or that needs to be fixed, see How to Contribute or let us know in the Juice Slack #documentation channel.
Setup (Recent MacOS)
To get started developing Juicebox applications, you need to have the Juicebox development environment running on your computer. Open a Terminal window on your recent MacOS system and run the following commands:
- Configure keys:
- GitHub ssh key (using
ssh-keygenand upload the public key to your GitHub profile).
$ ssh-keygen -t ed25519 -C "your_email@your_provider.com"
- Place AWS keys in both
~/.botoand~/.aws/credentials. The two files should be identical:
[default]
aws_access_key_id = <YOUR_KEY_HERE>
aws_secret_access_key = <YOUR_SECRET_ACCESS_KEY_HERE>
- AWS needs some configuration in
~/.aws/config
[default]
region=us-east-1
output=json
mfa_serial=arn:aws:iam::<YOUR_IAM_DETAILS>
- Install XCode Command Line Tools:
$ xcode-select --install
- Verify XCode Command Line Tools installed, look for something like
/Library/Developer/CommandLineToolsas the command result:
$ xcode-select -p
- Install pyenv:
$ curl https://pyenv.run | bash
- pyenv must be loaded when the Terminal loads, and MacOS uses zsh by default:
- Edit the
.zshrcfile in your home directory to include the following:
eval "$(pyenv virtualenv-init -)"
- Edit the
.zprofilefile to include the following:
export PYENV_ROOT="$HOME/.pyenv"
command -v pyenv >/dev/null || export PATH="$PYENV_ROOT/bin:$PATH"
eval "$(pyenv init -)"
- Quit and load Terminal to verify no errors appear, and the Terminal will appear to be doing more work now that it is managing Python versions for you!
- In your new Terminal window, install a version of Python 3 which works with JuiceBox
- After ensuring your ssh key is configured in GitHub, proceed to clone
devlandia:
- Change into the fresh copy and indicate to pyenv that it is now managing the directory:
- Double check your AWS key configuration files, install the
requirements.txt, and runjb!
Subsequent Terminal windows which are opened will automatically activate the correct pyenv environment after each cd. You can always verify that a pyenv environment is configured for a directory by running pyenv local at any time:
Setup (Legacy)
To get started developing Juicebox applications, you need to have the Juicebox development environment running on your computer.
Configuring AWS credentials
As developers and implementors, you will need AWS keys to access certain parts of the app that utilize AWS resources.
- Create an OPS ticket to get an AWS account. OPS will send you credentials.
- Add the keys to a file called
~/.boto.
[Credentials]
aws_access_key_id = YOUR_ACCESS_KEY_HERE
aws_secret_access_key = YOUR_SECRET_KEY_HERE
3. You will also need to have your credentials in the ~/.aws/credentials file
(for use with the AWS cli, it doesn’t seem to pull credentials from ~/.boto).
It is in the following format:
[default]
aws_access_key_id = YOUR_ACCESS_KEY_HERE
aws_secret_access_key = YOUR_SECRET_KEY_HERE
Installing Homebrew (Mac only)
Homebrew is used to provide both the Python and Node.js programming languages. You may be prompted to install the Xcode CLI tools when you run this command as they are required.
/usr/bin/ruby -e "$(curl -fsSL https://raw.githubusercontent.com/Homebrew/install/master/install)"
Installing Python
Almost all of the work on developing data services is done via Python. While Macs ship with Python installed, it’s easier to use Python from Homebrew to avoid many pitfalls.
brew install python@2
Run the following command and you should see different files that’ve been installed. As of this writing it should show Python 2.7.16. The patch version is subject to change, but as long as you have a 2.7.x release everything should be ok. If not contact a member of OPS for troubleshooting steps.
brew list python@2
Setting up your SSH key with Github
First, follow the Github guide on checking any existing keys you might have, and generating one if necessary. After a key is setup you’ll also want to setup an SSH config entry to use this key.
In your ~/.ssh/config file, add a block like the one below:
Host github.com
    Hostname ssh.github.com
    Port 443
    user <githubusername>
    IdentityFile ~/.ssh/<ssh_key>
The 443 port is needed because of an issue we discovered where users were unable to interact with Github while on the Juice VPN.
Cloning Devlandia
For the sake of an example and clarity we’ll assume everything starts from the Desktop, so in a terminal run cd ~/Desktop.
For local development work we use Devlandia, our Docker based development environment. Additional Devlandia documentation can be found here.
To get started, either use the terminal and git commands or use Github desktop to clone the repository:
$ git clone https://github.com/juiceinc/devlandia.git
We should now have Devlandia in a directory at ~/Desktop/devlandia. Change into the Devlandia directory
with cd devlandia. So far so good!
Setting up a virtual environment and requirements
The simplest way to get set up is to run ./scripts/setup.sh. This will install virtualenv and virtualenvwrapper,
create a virtual environment for Devlandia in ~/.virtualenvs/devlandia using the Python interpreter we installed with
Brew, add a couple of entries to your ~/.bash_profile, copy an SSH key we’ll use for debugging, add a postactivate
script that will make sure you’re in your devlandia home directory every time you activate your environment, and pre-install all requirements.
To be safe, close your current shell and open a new one just in case changes weren’t picked up
when the script ran. Now you should be able to run workon devlandia and have the environment activated (you’ll see
(devlandia) at the beginning of your command prompt) and be taken to the root of your Devlandia directory!
If you have any issues running this script please contact a member of OPS.
Installing Docker
We use Docker containers to have a consistent setup for all users. If you don’t have it installed yet and are on a Mac, install Docker by downloading the .dmg from the following link. Once downloaded install it like you would any other application on your system.
Important
After Docker is installed, be sure to open it from your Applications directory. You’ll get a warning about running downloaded software and then Docker’s whale icon will show up in your toolbar. If you don’t start up docker yourself it won’t be able to start because it won’t have permissions.
Running
Starting the Development Environment
Now with everything installed and set up, you are ready to start the Juicebox
development environment. If you’re not in your Devlandia directory yet, run workon devlandia as before. There
are several environments to choose from. cd environments and you can see that we have stable, dev, and test.
The best place to get started is the stable environment so cd stable and to start the Juicebox Development
environment, use the jb start command. If it’s your first time starting up Devlandia you’ll have roughly a
1.5 GB download ahead for the Docker images. Once the download finishes you should see a large amount of output
go by, and it should mostly be green with no red. If it worked you should see the following:
Starting the Django dev server...
Performing system checks...

System check identified no issues (0 silenced).
May 17, 2016 - 13:25:31
Django version 1.8.8, using settings 'fruition.settings.docker'
Starting development server at http://0.0.0.0:8000/
Quit the server with CONTROL-C.
You should now be able to open up a web browser to http://localhost:8000/ and be prompted for login credentials. Contact a member of Juice for the username and password.
New Docker images will be deployed regularly as part of our Continuous Integration and Delivery processes, and Devlandia
will detect these changes. The default behavior of running jb start is to look for changes with the local image
you’re working on compared to the server version and to pull these updates so you’ll always be up to date.
If for whatever reason you don’t want to update the Juicebox image immediately, you can call the command as follows:
jb start --noupdate. This has to be done every time you start if you don’t want the image to update and if you’re
working on core code as opposed to app code this will be the way you want to start if you’ve just built a new image,
otherwise a change will be detected and it’ll pull the version that’s on the server.
Juice Commands
Note
For all jb commands, make sure you are in the same virtual environment that we setup above.
Current Commands
add          Checkout a Juicebox app (or list of apps) and load it
clear_cache  Clears cache
clone        Clones an existing application to a new one
create       Create a Juicebox from a template
ls           List available containers
manage       Allows you to run arbitrary management commands
package      Package a juicebox app (or list of apps) for deployment
pull         Pulls updates for the image of the environment you're currently in
remove       Remove a juicebox app (or list of apps) from your local environment
search       Query Elasticsearch and show results
select       Select tagged image to use
start        Configure the environment and start Juicebox
stop         Stop a running juicebox in this environment
test_app     Run gabbi tests against the application.
upgrade      Attempt to upgrade jb command line and yo juicebox
watch        Run the Juicebox project watcher
yo_upgrade   Attempt to upgrade yo juicebox to the current version
To see a summary of commands and what they do simply run jb and you’ll get a list. Below are the most common.
To add new apps, go to the root of Devlandia and run jb add <app_name>.
To clear the cache run jb clear_cache.
To run the watcher open a new terminal window and run jb watch. As long as this window is open live changes you
make will be reflected in the locally running app.
Debugging
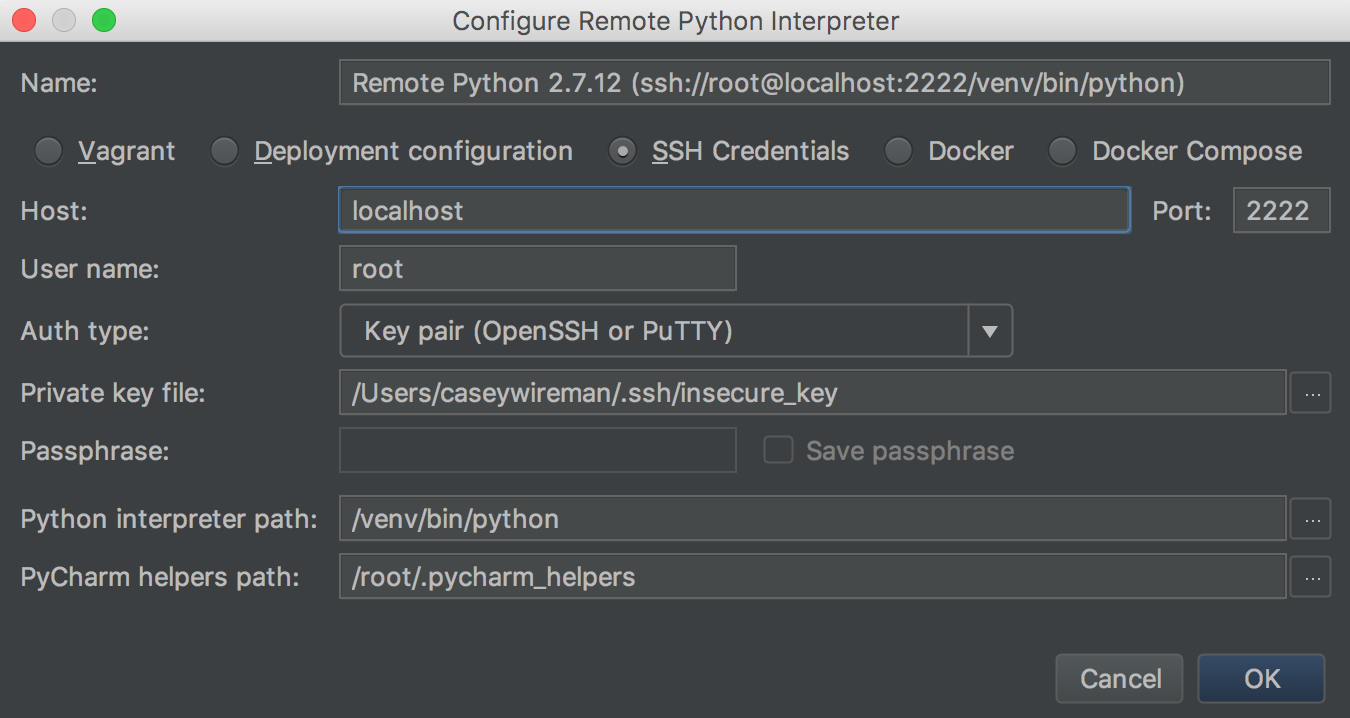
The Docker images are built with SSH enabled so that we can setup a remote interpreter through the connection. For local
development purposes, a default insecure_key is installed to make it easier to setup and distribute. This key should
have been setup for you if you used the ./scripts/setup.sh method above.
Once Juicebox is running, go to the PyCharm menu and click preferences. Select Project: devlandia and Project interpreter. Click the gear icon and Add Remote. Set your settings as listed in the image below.
PyCharm will complain if we don’t enable Django Support. To do this go to PyCharm -> Preferences -> Languages & Frameworks ->
Django. Click Enable Django Support. For Django Project root just find and choose your Devlandia project folder and you’re done.
If you work only in one environment in Devlandia, you should be good to go. Devlandia includes a Juicebox run
configuration that should work with the settings we’ve setup to this point. You should be able to set break points in
your app. Click Run -> Debug - 'Juicebox'. It will create a new debug server running on port 8888. Go to
http://localhost:8888 to interact with this debugging instance. It should now break on your break points.
Troubleshooting
Remote Host Identification Has Changed
If you’re trying to SSH into Devlandia, you may receive the following warning:
@@@@@@@@@@@@@@@@@@@@@@@@@@@@@@@@@@@@@@@@@@@@@@@@@@@@@@@@@@@
@    WARNING: REMOTE HOST IDENTIFICATION HAS CHANGED!     @
@@@@@@@@@@@@@@@@@@@@@@@@@@@@@@@@@@@@@@@@@@@@@@@@@@@@@@@@@@@
IT IS POSSIBLE THAT SOMEONE IS DOING SOMETHING NASTY!
Someone could be eavesdropping on you right now (man-in-the-middle attack)!
It is also possible that a host key has just been changed.
The fingerprint for the ECDSA key sent by the remote host is
*************redacted**************
Please contact your system administrator.
Add correct host key in /Users/<username>/.ssh/known_hosts to get rid of this message.
Offending ECDSA key in /Users/<username>/.ssh/known_hosts:16
ECDSA host key for [localhost]:2222 has changed and you have requested strict checking.
Host key verification failed.
You will need to edit your ~/.ssh/known_hosts file. You can either update it to the correct key value if you
know it, or you may remove the line that begins with [localhost]:2222 altogether and the key will be set correctly again
when you try to SSH in again. If you’re not comfortable doing this please contact a member of Ops and they can help you
out.
Warning
It’s fine in the case of Devlandia to make this change as it’s just running locally and we trust it. If you encounter this warning on any other servers, please contact a member of Ops for assistance as it may be a security issue.
Port Already Allocated
In some cases you may encounter some variation of the following error: Error starting userland proxy: Bind for
0.0.0.0:8000 failed: port is already allocated. This is most likely due to a program running on the port we need
(Juicebox in Vagrant for example). Be sure to kill the task that’s using the port, and try again. If you still encounter
this issue and you’re sure you’ve killed the necessary, try restarting Docker. On Mac there will be a Whale icon in your
top task bar, click that, and restart should be the first option. If all else fails try a full restart of your computer.
Signature Expired
The following error seems to come up if you’ve started Juicebox and left it running for quite a while. The credential session expires after 12 hours in most cases. Normally a restart of Docker fixes this issue, but if not try a full reboot. We have seen a couple of variations of the message, listed below, but the fix is the same.
botocore.exceptions.ClientError: An error occurred (InvalidSignatureException) when calling the Query
operation: Signature expired: 20170519T122830Z is now earlier than 20170519T124310Z (20170519T125810Z - 15 min.)
credstash.KmsError: KMS ERROR: Decryption error An error occurred (InvalidSignatureException) when calling the
Decrypt operation: Signature expired: 20171010T195804Z is now earlier than 20171010T200613Z (20171010T201113Z - 5 min.)
Debugging Not Working
There could be a couple issues at play here. In the PyCharm menu -> Project: devlandia -> Project Interpreter, check to be sure you have a path mapping set. It should be /apps -> /code/apps. If it’s already set but you can’t hit any breakpoints, try removing and readding this path mapping. Map the root of your devlandia directory/apps -> /code/apps. The project root is a virtual mapping that gets expanded, but due to quirks in PyCharm it doesn’t always get translated correctly and you’re left with an invalid path that doesn’t map to anything.
Core Development
If you’ll be working on the core and wanted to test things in Devlandia, you’ll use a bit of a different workflow.
Clone the develop branch of fruition into /environments/core/ with
git clone --recursive git@github.com:juiceinc/fruition.git. You should now have a structure like the following
environments/core/fruition/. Then do a npm install in the /frution directory.
The core docker-compose file is currently based on the image from /environments/dev. The docker-compose file selectively mounts your local Juicebox code subdirectories into corresponding directories inside the container at /code/. Edits to local core code should be reflected inside the running container. You will be responsible for keeping this branch up to date. It’s not something Devlandia will handle itself.