Part 4 - Building the Slices
Lesson 5: The Free Form Slice
Building a Free Form Slice
The first slice in our NFL app is a free form slice; it functions just as a header for our stack. These slices allow you to create custom output based on a template that you define. Most often, free form slices are static text and don’t even use a recipe.
Your turn
Create a free form slice based on the mock-up below.
- Define a template in
templates.htmlto render the text.- Set the proper options for a free form slice in the
stack.yamlfile.- Use the Free Form docs for details to complete this exercise.
Tip
There is no data so we will not need a data service.

Lesson 6: The Option Chooser Slice
Building an Option Chooser Slice
The option chooser slice presents a user with multiple options and uses their selection to alter the presentation of the stack below that slice. Most commonly, we use the option chooser to present multiple metrics at the top of the stack and base the following slices on the single metric selected there.

Above is the option chooser from the census app, with % Female selected.
Below is the stack.yaml from our census app. As you can see, in it we define:
- slice type
- title to display
- configuration values (which define things like the # of options a user may select)
- template that the option chooser will use to render the slice
1 2 3 4 5 6 7 8 9 10 11 12 13 14 15 16 17 18 19 20 21 22 23 24 25 26 27 28 29 | slices: # # Slice documentation: https://dev.juiceboxdata.com/static/docs/slices.html # How to build titles: https://dev.juiceboxdata.com/static/docs/title-templates.html # - slice_type: "option-chooser" # The title line for the slice. title: "Explore your data" # Detailed configuration for the slice. config: "maxSelections": 1 "minSelections": 1 "optionExtraClass": "option-item-fixed-width" "optionTemplate": |- <div data-id="<%=datum.id%>" class="group-container__item"> <div class="group-container__item__label"> <%= datum.label %> </div> <div class="group-container__item__value"> <%= datum.format('value', null, 'id') %> </div> </div> "showTitles": false # Provides data to the slice # Can be either a data service class in your service.py file # (e.g. 'realtorservice.RankedListService') # or a json file in the fixtures directory (e.g. 'rankedlist.json') data_service: "censusv2_services.KeyMetricsService" |
And the data services file:
1 2 3 4 5 6 7 | class KeyMetricsService(CensusService): def build_response(self): self.metrics = ('pop2000', 'pop2008', 'popdiff', 'avgage', 'pctfemale') recipe = self.recipe().metrics(*self.metrics) response = recipe.render() response['templateContext']['notes'] = "Data from US Census Bureau" self.response['responses'].append(response) |
Notice in line 1 where the definition of the data service for this slice inherits
from the base service. All data services must contain a method called build_response(),
which is where you map the results of the recipe.
In line 3, we define an iterable of all the metrics we want to query.
Note
Notice that there are no dimensions? That’s because all metrics displayed in this option chooser are for the population as a whole, so there is no need for any grouping. You don’t have to have a dimension, metric, and filter in every recipe–they can be created from any number of ingredient types.
In line 4, we define and execute the recipe, passing it the metric ingredients tuple we’ve created. This results in a python object list of the rows returned from the SQL query that your recipe generated.
Data services must return a JSON response, so we need to transform this
python object into JSON. This happens in line 5 with recipe.render().
Each recipe includes a renderer that handles the transformation and creates
the data service response.
Line 6 sets a value that will be read by the slice template for display in the view.
Finally, in line 7 we actually add the response we created to the data services list of responses.
Your turn
1. Think about which metrics, dimensions, or filters you will need to define.
2. Use the Option Chooser slice docs and the example below to construct your own Option Chooser slice!

Hint
This option chooser is not selectable–you will have to configure that in stack.yaml.
Lesson 7: The Distribution Slice
Building a Distribution Slice
Distribution slices are a good way of showing population across a range of groups. For example, look below at the distribution slice from our census app:
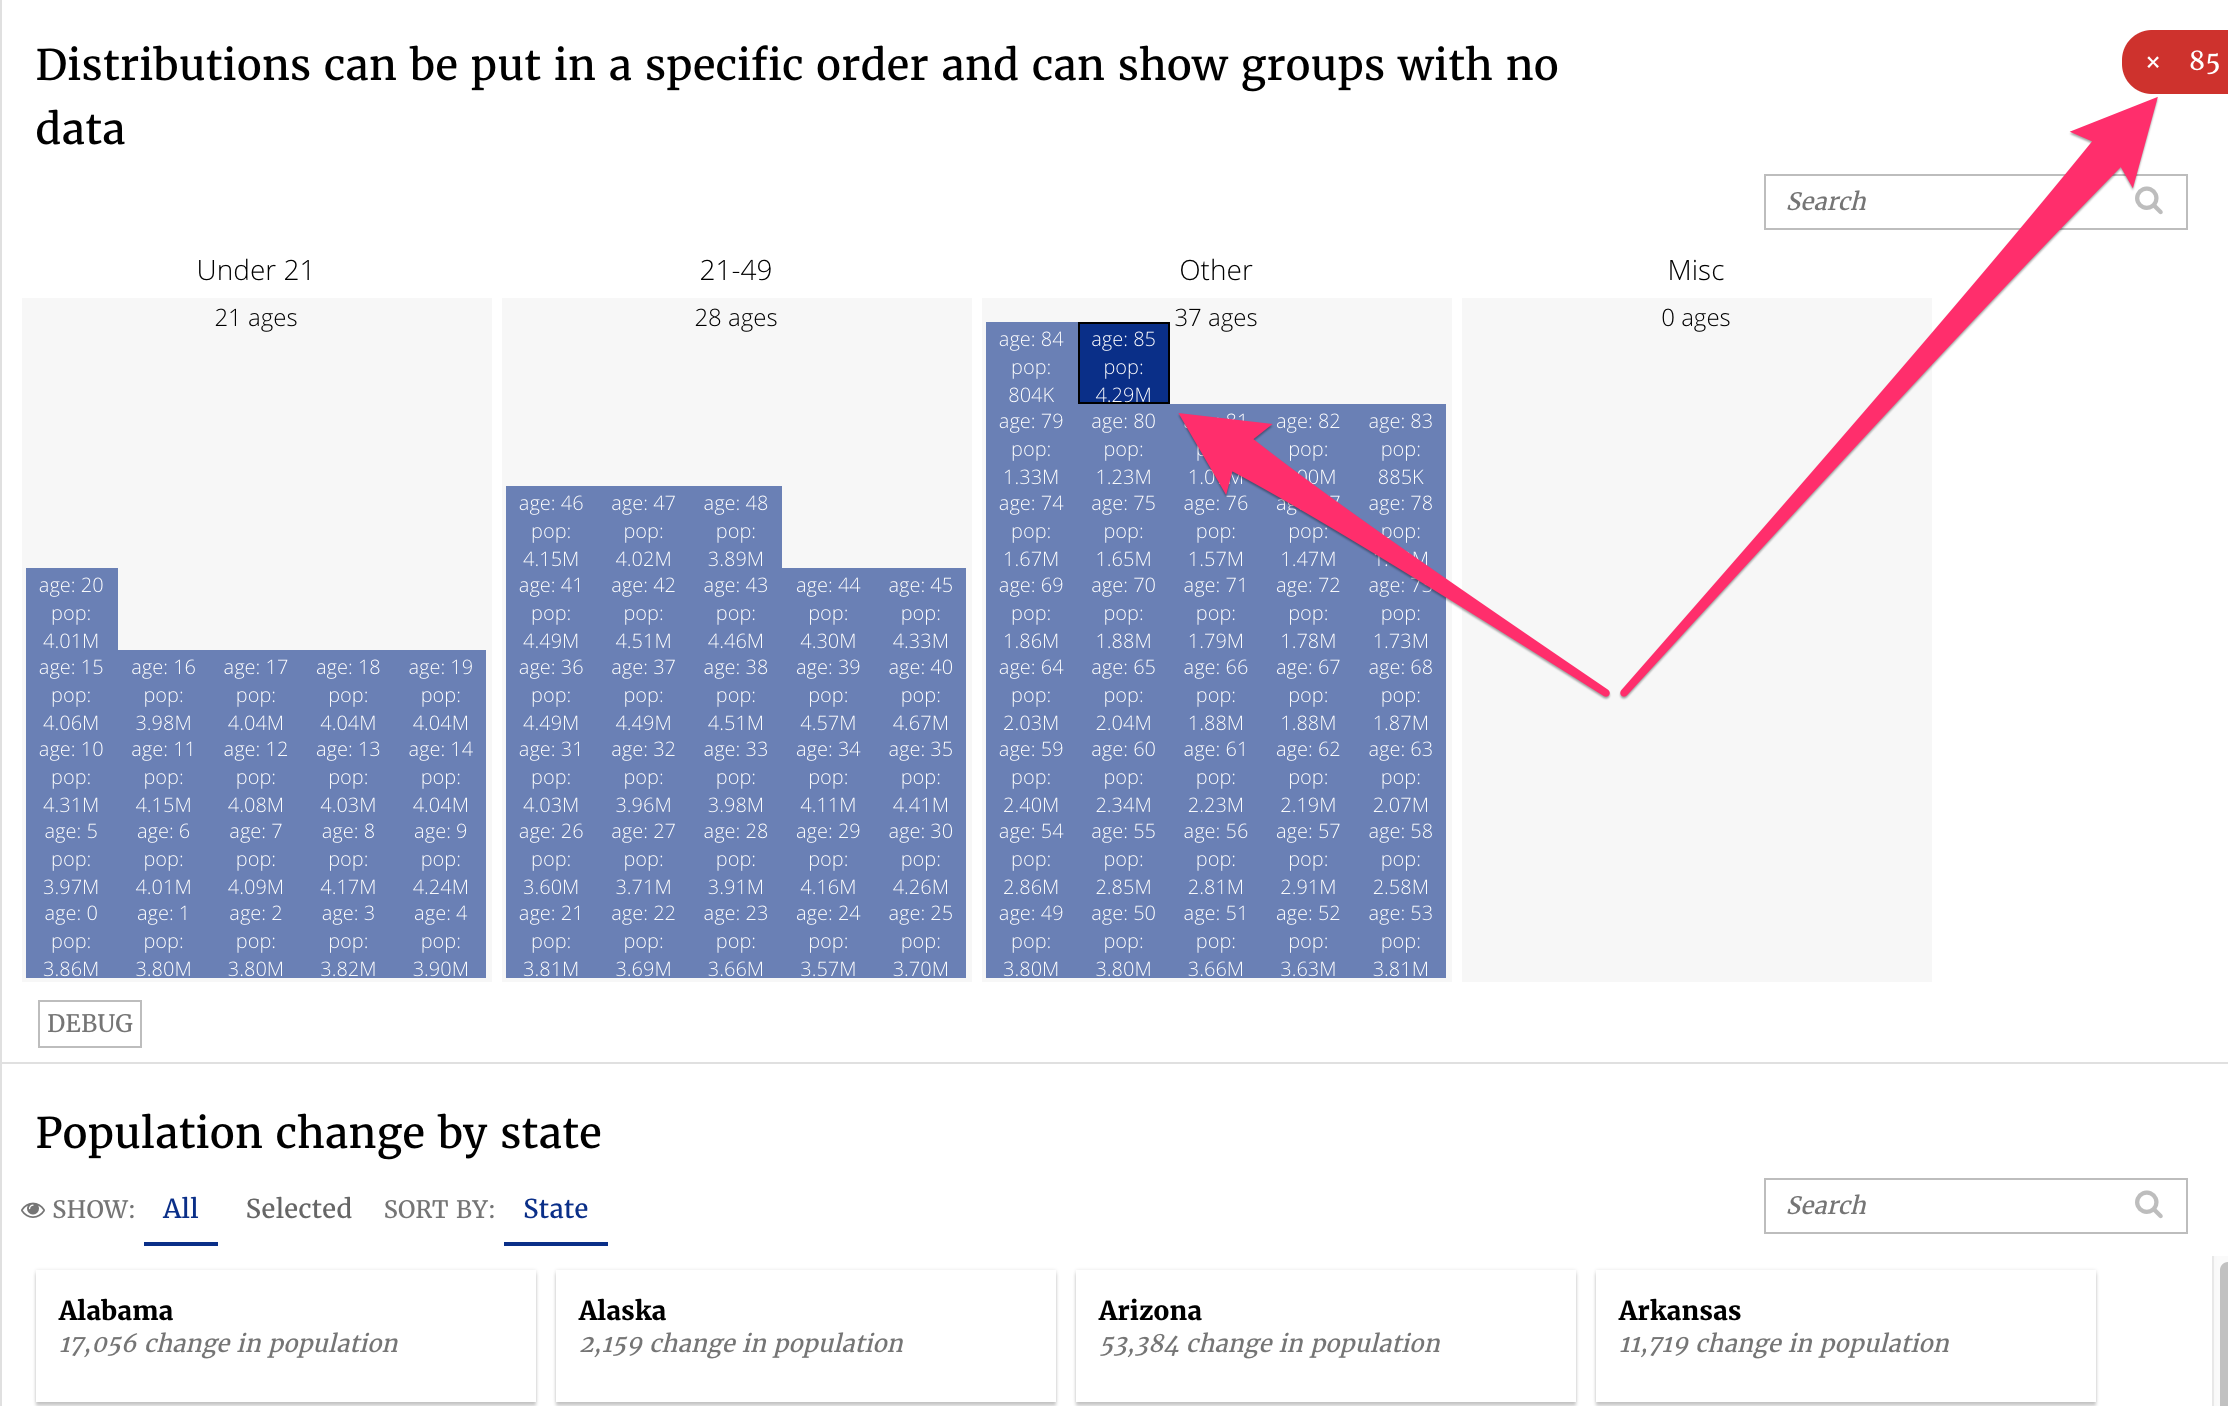
There are four buckets on display for our census data, each labeled at the top of the bucket. Each cell in the bucket represents a particular age and how large that population is (i.e. 4.01 million 20 year olds in the under 21 bucket). We can select individual cells to take a closer look at a particular age group, select the entire bucket or multiple buckets.
There are 3 steps to setting up this distribution slice. First, the data service:
1 2 3 4 5 6 7 8 9 10 11 12 13 | # Dimensions are ways to split the data. dimension_shelf = { # Simplest possible dimension, a SQLAlchemy expression and a label. 'state': Dimension(Census.state, singular='State', plural="States"), 'age': Dimension(Census.age, singular='Age', plural="Ages"), # This will use the lookup to get display values of "M" and "F" 'sex': LookupDimension(Census.sex, label='Sex', lookup={'M': 'Menfolk', "F": "Womenfolk"}, singular="Gender", plural="Genders"), 'age_bands': Dimension(case([(Census.age < 21, 'Under 21'), (Census.age < 49, '21-49') ], else_='Other'), label='Age Bands'), } |
Distribution slices generally require a grouping dimension. Here, we’ve defined
age_bands (lines 10-12).
Note
You may notice that this dimension’s first argument is a case statement instead of a column. This allows you to apply some logic to the columns you are selecting.
Remember that a dimension produces a SELECT and a GROUP BY. The age_bands dimension
produces the following SQL:
1 2 3 4 5 6 7 8 9 10 11 | SELECT CASE WHEN (demo.census.age < 21) THEN 'Under 21' WHEN (demo.census.age < 49) THEN '21-49' ELSE 'Other' END AS age_bands FROM demo.census GROUP BY CASE WHEN (demo.census.age < 21) THEN 'Under 21' WHEN (demo.census.age < 49) THEN '21-49' ELSE 'Other' END |
Using age_bands we can create the following recipe:
1 2 3 4 5 6 7 8 9 10 | class DistributionService(CensusService): def build_response(self): self.metrics = ('pop2000',) self.dimensions = ('age_bands', 'age') recipe = self.recipe().dimensions(*self.dimensions) \ .metrics(*self.metrics).order_by(*self.dimensions) self.response['responses'].append(recipe.render(render_config={ 'order': ['Under 21', '21-49', 'Other', 'Misc'], 'show_all': True })) |
This recipe produces the SQL below on the left, which results in the dataset below on the right.
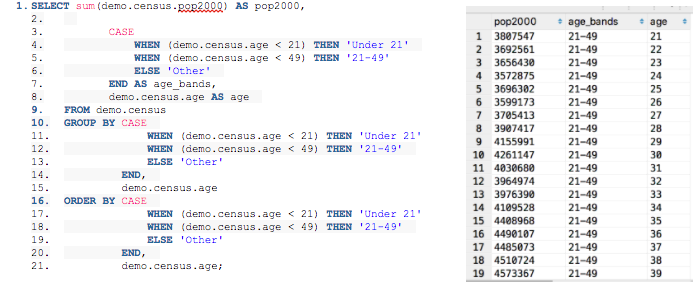
This returned data shows a population in 2000, the age, and the age_band
that it falls in, which is exactly the info we need to create the distribution
graph we see above.
Your turn
- Build the distribution slice for the NFL app according to the mock-up below.
- Use the Distribution documentation to help.
Lesson 8: The Card Slice
Building a Card Slice
The card slice is used to present details about data in a way that is both searchable and sortable.
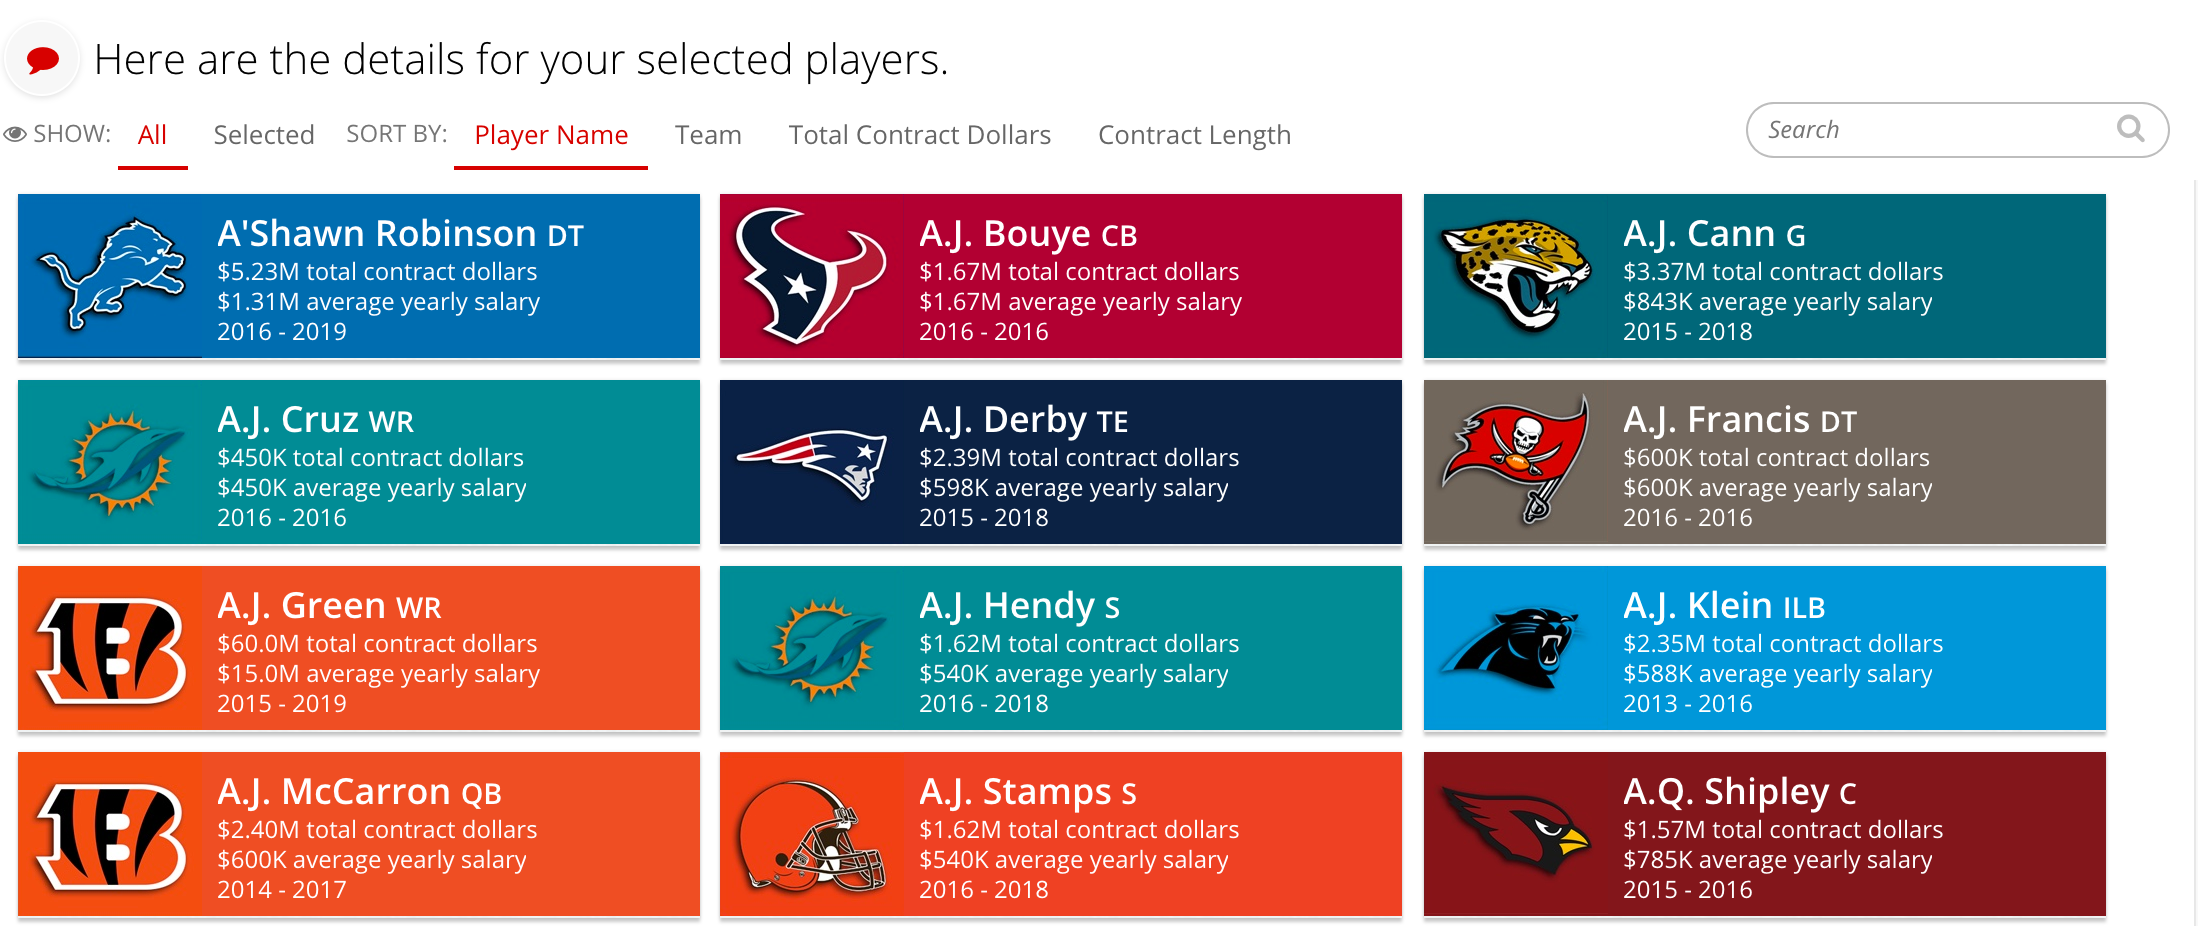
Below is the card slice from the census app. Each card represents a state’s population change from 2000 to 2008. This card slice has one sorting option, State, which is selected.
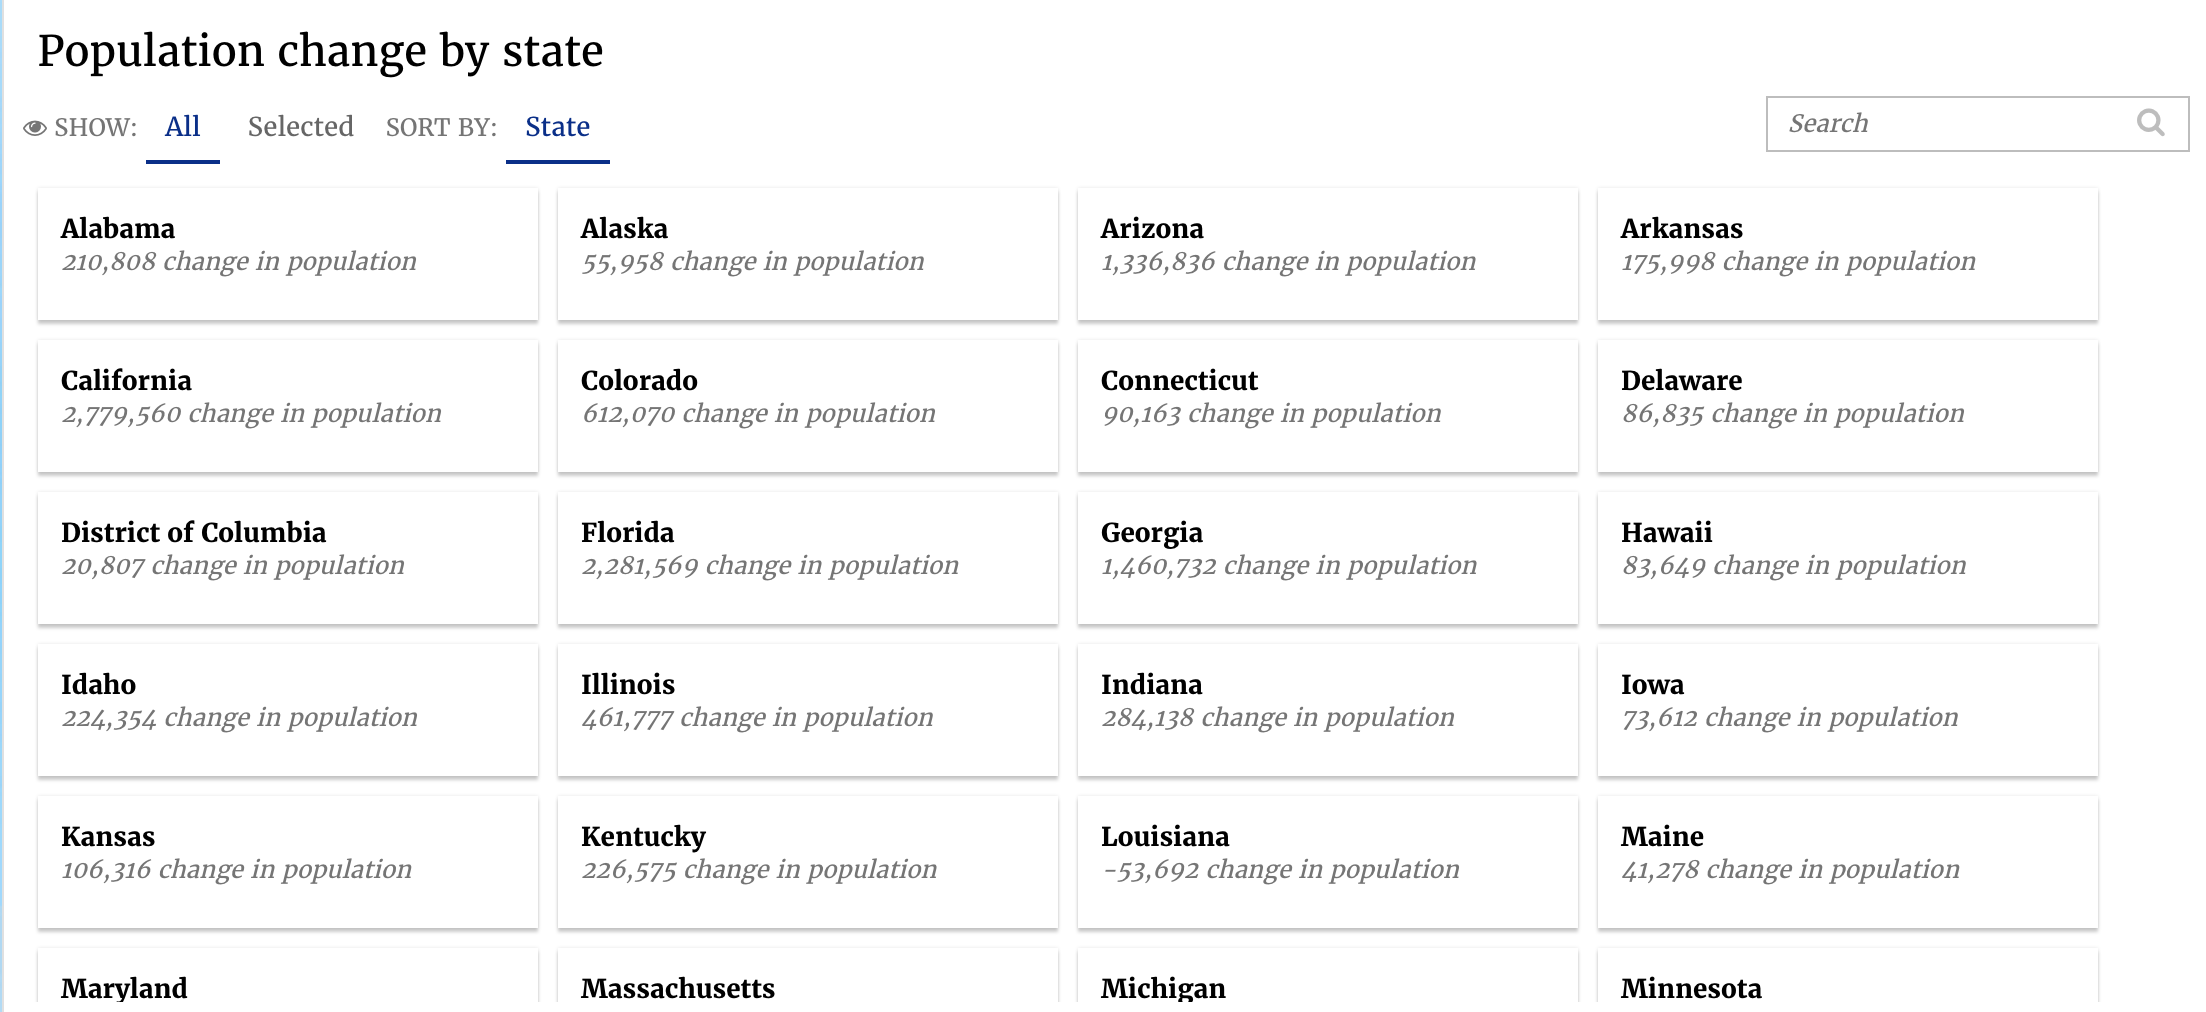
The card slice’s stack.yaml includes some new configuration options. The
option to configure how cards are sorted is set under sortFields. Here, we
have also assigned a template to be used to define what individual cards look
like.
1 2 3 4 5 6 7 8 9 10 11 | - slice_type: "card" slug: "pop_card" title: "Population change by state" config: "sortFields": - "default": "true" "field": "state" "label": "State" "sortDirection": "ascending" "cardTemplateName": "#jam-card-template" data_service: "censusv2_services.CardV3Service2" |
Below is the card template, referenced in templates.html:
1 2 3 4 5 6 | <script type="text/template" id="jam-card-template">
<div class="fr-body2"><%= datum.label %></div>
<div class="fr-caption">
<%= datum.format("popdiff", ',.0f') %> change in population
</div>
</script>
|
The data service for the card slice:
1 2 3 4 5 6 7 8 9 | class CardV3Service2(CensusService): def build_response(self): self.metrics = ('popdiff',) self.dimensions = ('state',) recipe = self.recipe().metrics(*self.metrics).dimensions( *self.dimensions) self.response['responses'].append(recipe.render()) |
Note
Because the card slice lives below the distribution slice in this app, it is important to remember that making a selection in the distribution slice changes what we see here. In the image below, only 85 year olds are selected, so only cards for that population change will appear.
Your turn
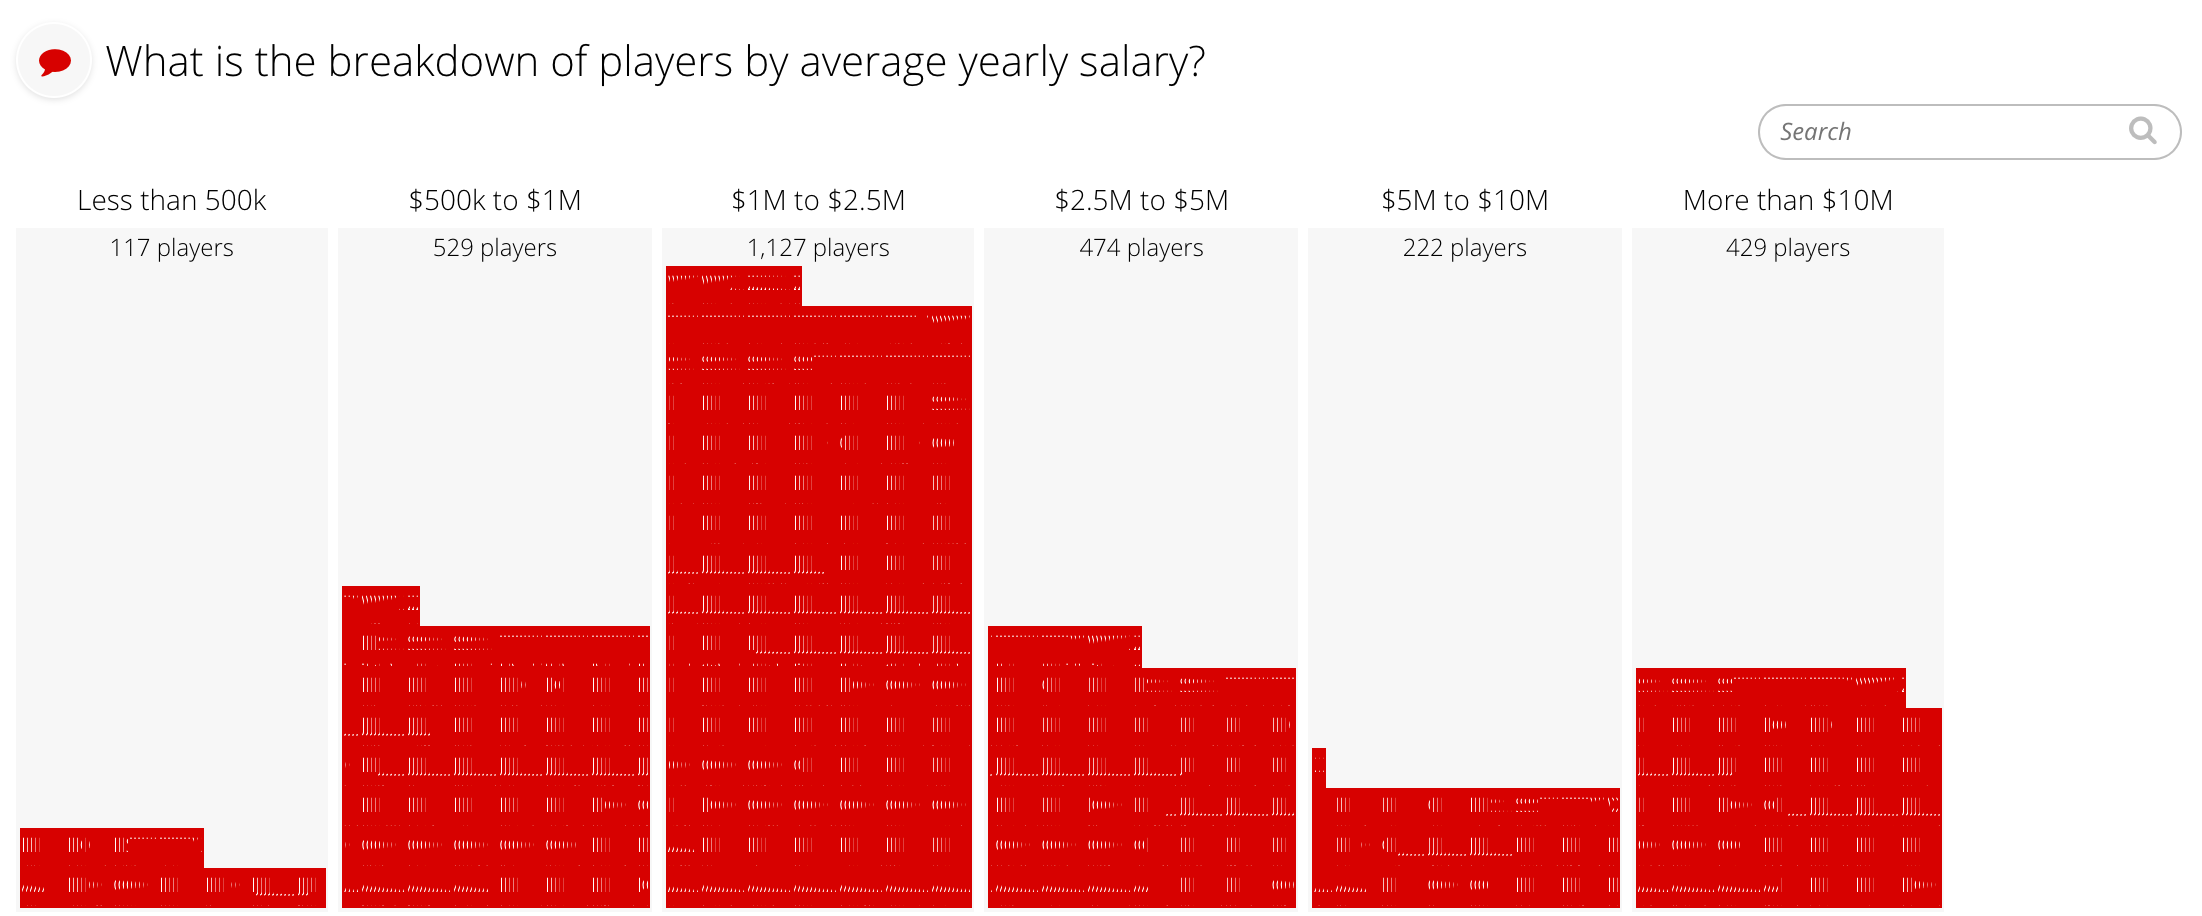
- Implement the NFL card slice, like the mock-up below
- Four sort values are defined:
- player name
- team
- total contract dollars
- contract length
- Each card lists the following attributes of each player:
- name
- position
- total contract dollars
- average yearly salary
- start and end year of current contract
Implement the NFL card slice from the mockup below. Each card lists the player’s name, position, total contract dollars, average yearly salary, and the starting and ending year of their current contract. There are also four sort values defined as well.
Lesson 9: Global Filters
Building a Filter Service
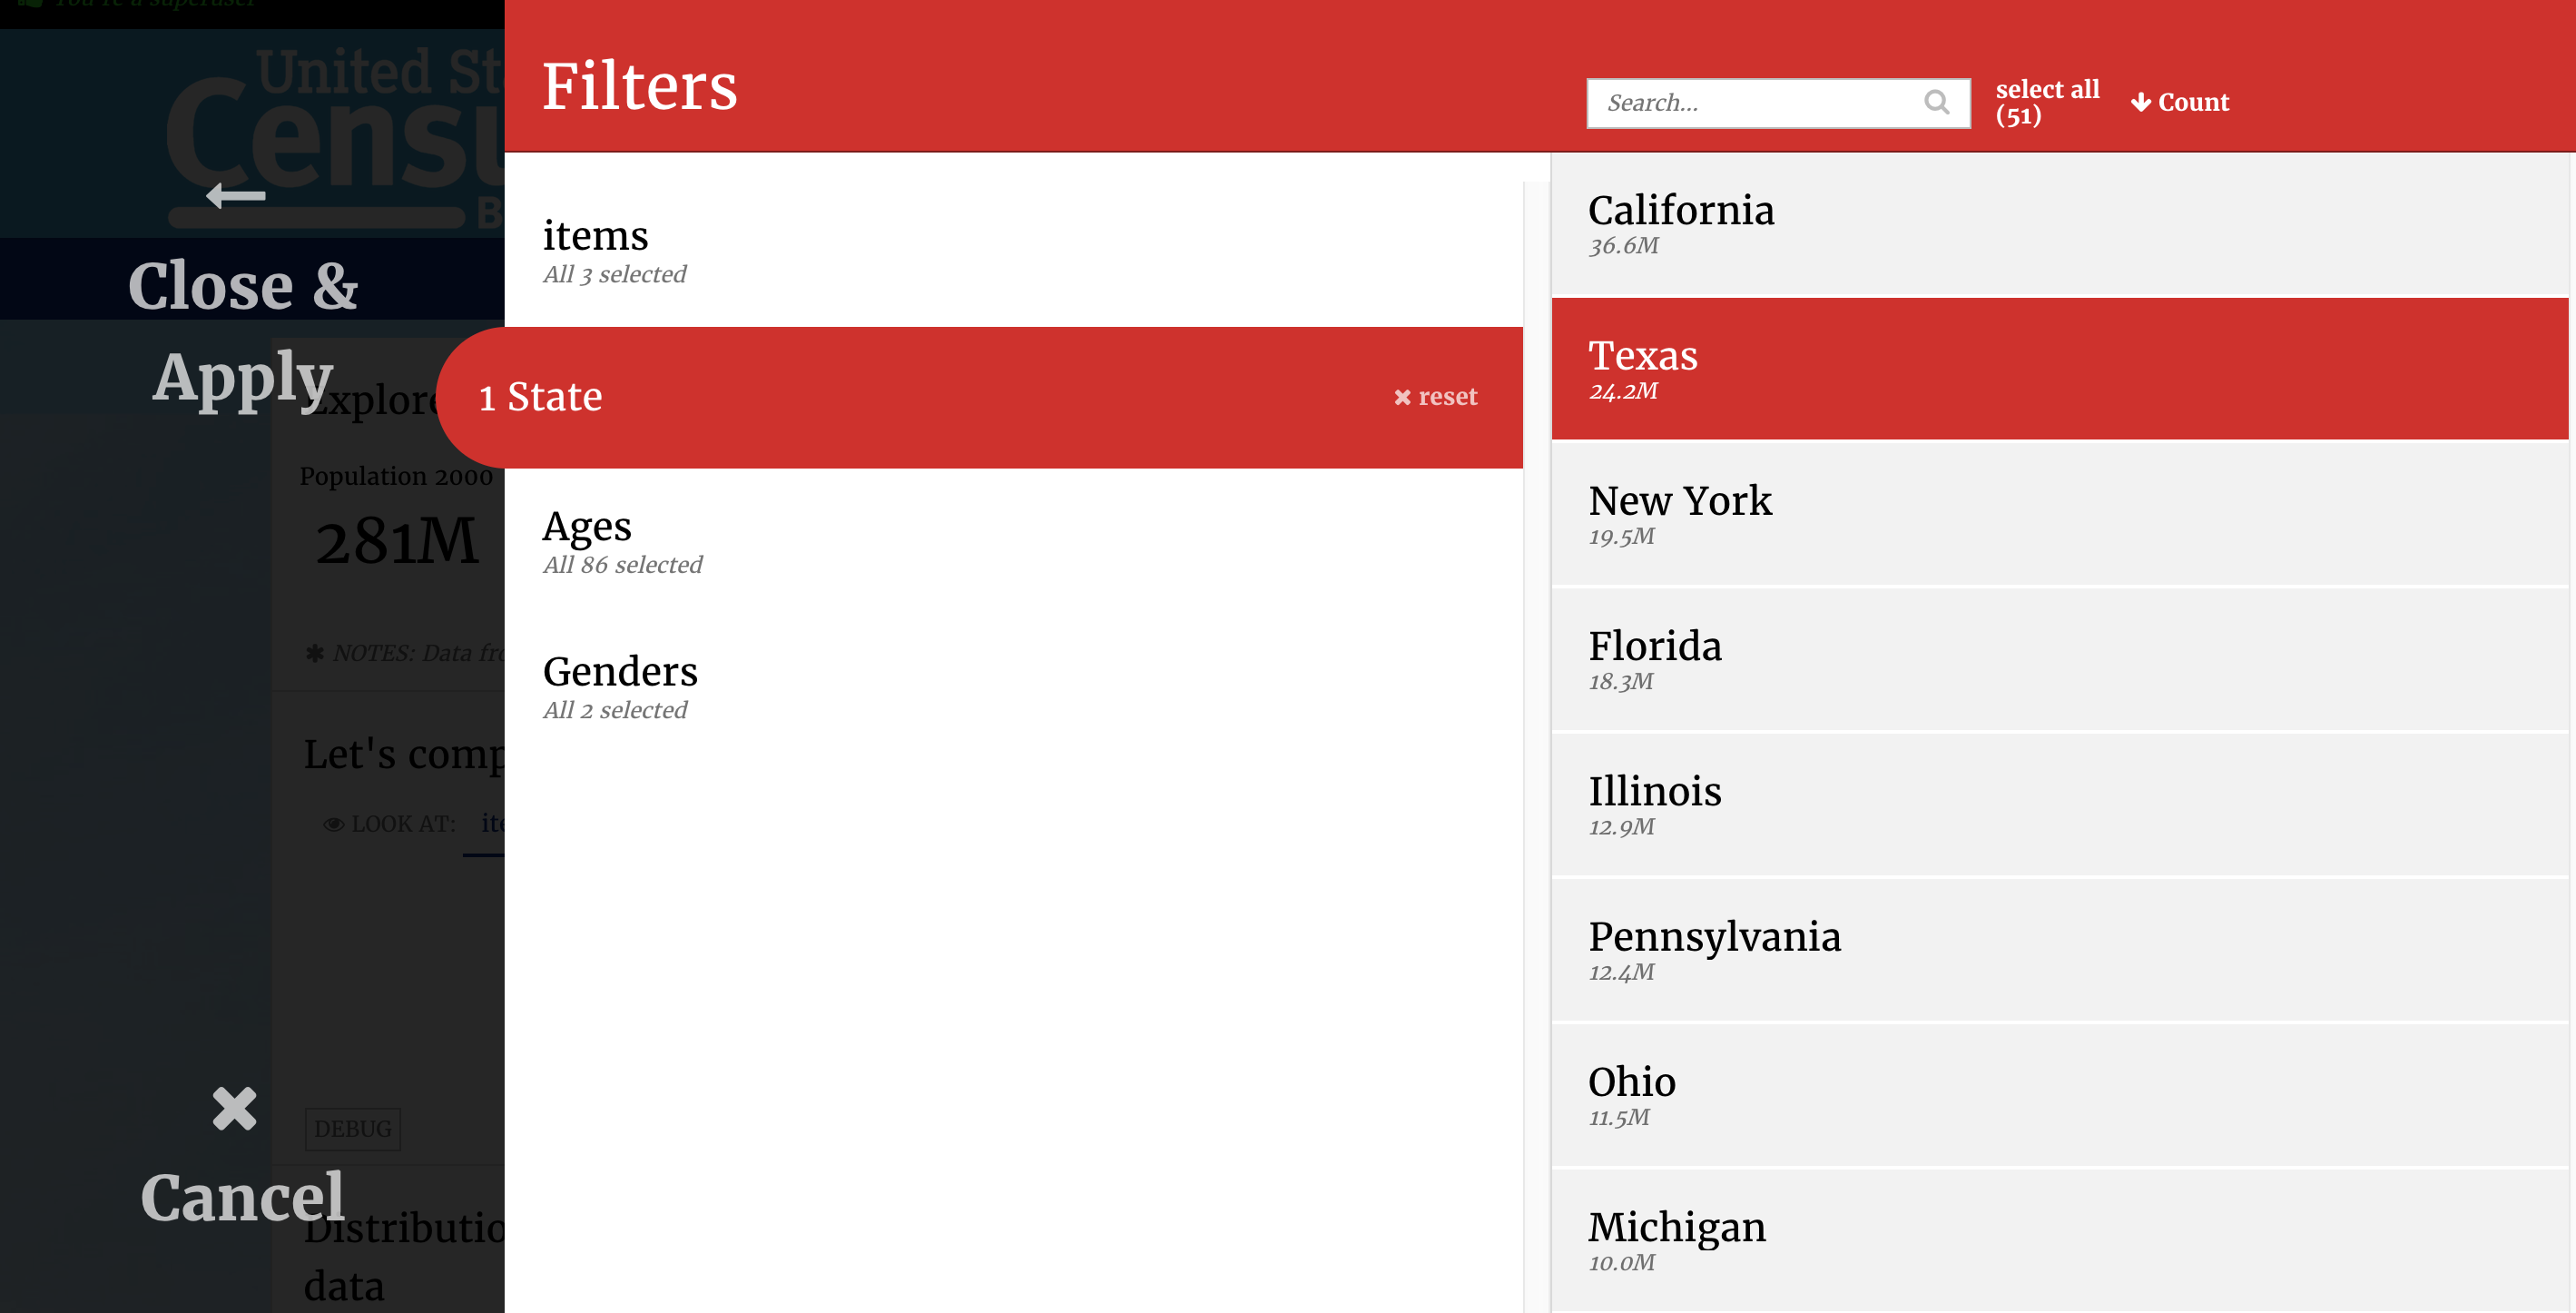
The filter service is a data service like any other, but its purpose is to return the grouping of your dimensions to the front end.
The census app uses the sex and state dimensions as global filters, so the front end needs to know what the options are for sex (M/F) and for state (AL through WY).
The filter service above from our demo census app is fairly simple:
1 2 3 4 5 6 7 8 9 10 11 12 13 | class FilterService(CensusService): """ Support global filters """ def build_response(self): self.metrics = ('sex', 'state',) recipes = [] for dim in self.automatic_filter_keys: recipe = (self.recipe().metrics(*self.metrics).dimensions(dim), dim) recipes.append(recipe) self.response['responses'] = RecipePool(recipes).run() |
As you can see, this filter service only uses one filter. Metrics in the filter service are used to show the count of whatever filter you are choosing.
For instance, in the example below we have chosen the state global filter and selected Texas. The global filter window also shows the pop2008 for Texas, in smaller text underneath the State name.
The above code loops through each dimension we want in our global filters (line 9) and creates a list of recipes (lines 10 - 11).
You will notice a slight difference here versus other slices. In line 13, when creating the response we use a recipe pool.
Recipe pools are useful when you have multiple recipes that you need to run. Instead of executing the queries one after the other, recipe pool will send all queries at once. This means that the execution time is equal only to that of the slowest recipe, instead of being the sum of all the recipes.
In lines 10 - 13, the RecipePool object takes a list of tuples containing
the recipe itself and the dimension it represents.
Your turn
- Write your own global filter service using the example above, for the team and position dimensions.
- Take a look at the Global Filters docs for more details.